PVC Ceiling Panel Installation Guide: Clip Spacing, Expansion Gaps & Sag Prevention
May 29, 2026
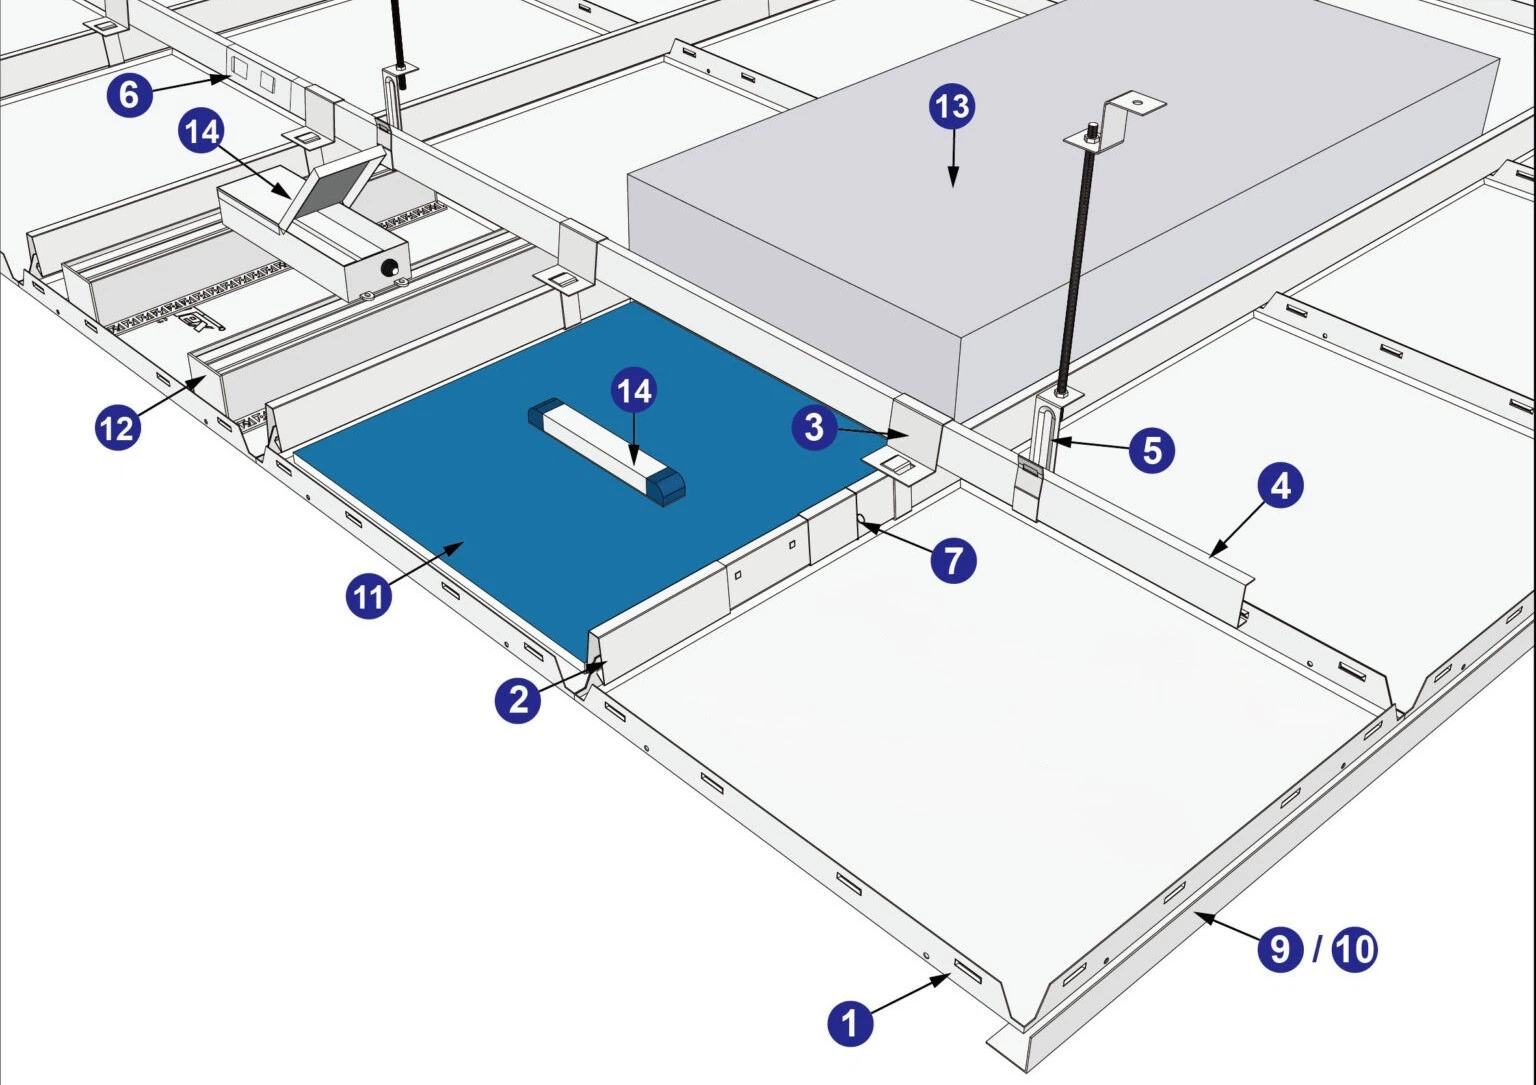
Schematic diagram of ceiling clip structure
On This Page
- I. Nobody buys a ceiling. Then a ceiling sags.
- II. Why the F-trim line deserves a builder's square, not a guess
- III. Plastic clip, metal clip - the difference you feel after two summers
- IV. The hole
- V. Soft panel, hard panel: 300 mm, 400 mm, and the number on a spec sheet nobody reads
- VI. The 3 mm thing that keeps ceilings flat
- VII. What to inspect before the first clip clicks
A PVC ceiling panel fresh out of the box is flat, light, and almost comically easy to handle. A contractor can unload a roomful of panels in under ten minutes. It is only later-six months, eighteen months, sometimes three years-that the evidence of what happened during those ten minutes starts to appear. A seam that has opened by half a millimeter. A corner that dips below the trim line. A panel that still looks fine at a glance but bounces when you press it with a mop handle.
None of this is the material's fault. A properly installed PVC ceiling will stay flat for a decade or more. The problems start when an installer treats it like a timber ceiling, or a gypsum ceiling, or something that can just be screwed in place and forgotten. PVC is a thermoplastic. It moves. It expands when the room heats up and contracts when it cools. The entire installation methodology-the trim, the clips, the spacing, the sequence-is built around accommodating that movement without letting the panel escape the grid. When the methodology is ignored, the panel does exactly what physics tells it to do. It escapes.
The search trends confirm what any supplier who fields warranty calls already knows. In markets across Southeast Asia and South Asia, the most frequent queries are not about whether PVC ceiling panels are water-resistant or termite-proof. They are about how to install them on a timber frame, what clip system to use, how far apart the clips need to be, and which measurement, if any, prevents a panel from sagging six months later. This article is about those questions. Not the brochure answers. The site answers.
I. Nobody Buys a Ceiling. Then a Ceiling Sags.
A ceiling is the last thing anyone looks at during a renovation. The floor gets measured. The walls get painted. The lighting gets planned. The ceiling gets whatever budget is left. This is not a regional phenomenon. It is true in Jakarta, in Dhaka, in Lagos, in every market where the cost of a room is counted per square meter and the ceiling is the invisible square.
The consequence is that PVC ceiling panels-despite being one of the most practical overhead materials on the market-are routinely installed by people who have never read an installation guide. They learn from the person who taught them, who learned from someone else, who figured it out on a site in 2014 and never had a reason to change what worked that day. The method propagates. The panels keep going up. And somewhere between the third and fifth project, a panel sags and nobody knows why, because the method had always worked before.
It had not always worked. It had always been within the margin of luck. A ceiling installed in a room that never gets above 28°C and never sees direct sunlight will tolerate almost any clip spacing. The same ceiling in a room with a west-facing window and a tin roof will expand into a different shape by 2 p.m. The installer who has only worked in the first kind of room will believe, honestly, that the method is sound. The homeowner in the second kind of room will call the supplier and describe a ceiling that looks like a hammock.
The installation variables that matter-the starting line, the clip type and spacing, the expansion gap, the reinforcement around cutouts-are not hidden knowledge. They are documented, tested, and consistent across manufacturers. The gap is not in the information. The gap is in the transmission, and the transmission breaks at the point where the written word meets the assumption that this ceiling can be installed like the last one.
II. Why the F-trim Line Deserves a Builder's Square, Not a Guess
The single most destructive shortcut in PVC ceiling installation happens before a single panel leaves the box. The installer measures from the slab to the intended ceiling height at one corner, marks the wall, and uses a spirit level or a chalk line to carry that mark around the room. The F-trim-the perimeter channel that holds the panel edges-gets screwed along that line. Done.
Except the slab is not level. It is never level. In older buildings, the deviation across a four-meter span can be twenty or thirty millimeters. If the F-trim is installed parallel to the slab, the ceiling will follow the slab. The panels will not sag. The entire ceiling will slant, and the slant will be invisible until someone hangs a pendant light or looks at the gap between the ceiling and a door frame. By then, the trim is screwed in, the panels are clipped, and the correction involves dismantling the whole grid.
The alternative takes twelve minutes. Find the lowest corner of the room relative to the slab. Transfer that reference to all four walls using a laser level or a water level. The F-trim is now horizontal regardless of what the slab does. The resulting gap between the trim and the slab will vary around the perimeter, but the ceiling will be flat. The gap gets hidden by crown molding or left as a shadow line. It is a detail that nobody sees, but everyone would notice if it were done wrong.
There is a second measurement that matters at this stage, and it is the depth of the F-trim relative to the panel thickness. A standard PVC ceiling panel is 5 mm to 8 mm thick, with 5 mm being the most common in residential ceiling applications across humid climates. The F-trim slot should accept the panel with about 1 mm of vertical play-not tight, not loose. A panel that sits tight against the trim slot cannot expand into the gap at the ends. A panel that sits too loose will rattle when a door slams. Neither problem is visible during installation. Both are audible within a week.
III. Plastic Clip, Metal Clip - the Difference You Feel After Two Summers
PVC ceiling clips serve one function and it is not the one most people assume. The clip is not holding the panel up. The panel is light enough that gravity barely registers. The clip is resisting two forces: thermal expansion, which pushes the panel sideways, and humidity cycling, which can cause the panel to bow between support points. A clip that fails at the second task leaves the panel in place but introduces a gap between adjacent panels as the expansion force overcomes the clip's grip.
In the field, two clip types dominate. Plastic clips, usually injection-molded polypropylene, snap into a metal runner or directly into a timber batten. They cost less and install faster. Their failure mode is thermal creep: after enough heat cycles, the plastic jaw that grips the panel tongue relaxes by a fraction of a millimeter. The fraction accumulates. A row of ten panels, each losing 0.2 mm of grip, opens a 2 mm gap at the far end. Nobody measures this because the gap develops over months, not hours, and by the time it is wide enough to notice, the installer is on another project.
Metal clips-galvanized spring steel, typically 0.4 mm to 0.6 mm thick-do not creep. They bite into the panel tongue with a force that does not degrade over time. The compromise is installation effort. A metal clip requires more insertion force than a plastic one, which means the installer's thumb is sore by the end of the day and the temptation to space the clips wider increases. This is the trade-off that product literature rarely mentions: the highest-performing clip is the one the installer is most likely to skip.
What separates a clip system that lasts from one that doesn't is not the material alone. It is the combination of clip force and spacing. A plastic clip at 300 mm centres can hold a panel flatter than a metal clip at 600 mm centres. The specifier who does not specify the spacing has delegated one of the most important installation decisions to whoever is holding the screw gun on the day. For the broader comparison of how ceiling materials perform under installation stress-and how PVC holds its geometry against gypsum and mineral fiber alternatives-the analysis in our ceiling material comparison article covers what each substrate does when the temperature climbs and the clip count drops.
IV. The Hole
Downlights happen. An installer cuts a circular opening in a PVC ceiling panel with a hole saw, runs the wiring, clips in the fixture. The panel around the cutout is now structurally compromised. A full panel distributes its own weight and any expansion stress evenly across its width. A panel with a 90 mm hole in the center concentrates that stress at the weakest remaining cross-section, which is the narrow strip of PVC between the cutout and the panel edge.
What happens next depends on whether that strip was reinforced. In most residential installations, it is not. The panel bows. The bow starts at the cutout, because that is where the material has the least stiffness, and propagates outward along the panel axis. Within a year, the ceiling around every downlight in the room dips slightly below the general plane. The effect is subtle-a few millimeters of deflection-but lighting picks it up instantly. A ceiling lit from above throws shadows that a flat ceiling does not.
The reinforcement technique is not complicated. A secondary batten or cross-noggin, installed behind the cutout and screwed into the two adjacent main runners, bridges the weakened section. The panel is supported at four points around the hole instead of two. The material cost is a 300 mm length of timber or aluminum profile. The time cost is about two minutes per cutout. On a ceiling with six downlights, the total additional labour is twelve minutes. The warranty call that results from not doing it consumes at least half a day. The arithmetic is not complicated either, but it is invisible to an installer paid by the square meter.
The same logic applies to any penetration. Exhaust fan openings. Access hatches. Air conditioning vents. Any cutout larger than 50 mm in any dimension creates a stress concentration. The fix is always the same: bridge the weak zone with a supporting member behind the panel. For ceiling systems in high-humidity spaces-kitchens, bathrooms, covered balconies-the approach described in our guide to PVC ceiling systems covers how panel thickness, ventilation, and light-cutout density interact in wet environments.
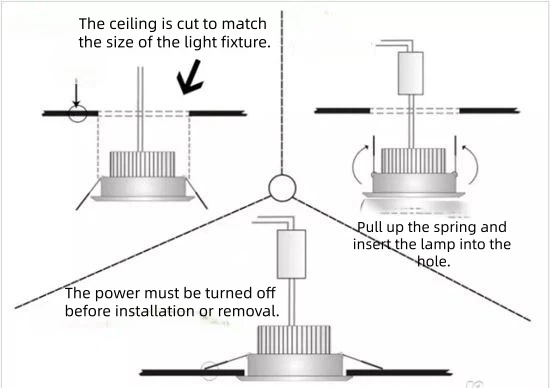
A cross-noggin behind the downlight opening redistributes stress around the cutout and prevents the most common cause of localised ceiling sag.
V. Soft Panel, Hard Panel: 300 mm, 400 mm, and the Number on a Spec Sheet Nobody Reads
Not all PVC ceiling panels are the same stiffness. The variable is density, and the range is wide. A panel in the 0.45 to 0.55 g/cm³ range, common in economy-grade products across South Asian markets, is visibly flexible. You can flex a two-meter length of it by hand without much effort. A panel at 0.60 to 0.70 g/cm³, which is where the mid-to-premium segment sits, is noticeably stiffer. It still flexes, but it fights back.
The clip spacing that works for the first kind of panel will not work for the second, and the failure mode travels in both directions. A soft panel installed on clip centres designed for a hard panel will sag between supports because the span is too wide for the material's flexural modulus. A hard panel installed on clip centres designed for a soft panel will stay flat but the installer will have wasted time and material on unnecessary clips, which is rarely the complaint but is still a cost embedded in the project.
The number that ties stiffness to spacing is not hidden. It is printed in the installation section of the technical data sheet and it almost never gets read. For panels with density at or above 0.60 g/cm³, a clip span of 400 mm between supports is generally sufficient in rooms without extreme temperature variation. For panels below 0.55 g/cm³, that number drops to 300 mm. The 100 mm difference sounds trivial. Across a ceiling that is five meters long, it means an extra row of clips and maybe twenty minutes of work. The trouble is that the installer does not know the panel density and does not ask. The panel arrives on site in a sealed box, and it looks like every other PVC panel the installer has ever used.
There is a simple field test that takes about eight seconds. Hold the panel by one end, horizontal, with two meters unsupported. If the tip drops more than a hand's width below horizontal under its own weight, the panel density is in the soft range and the clip spacing needs to tighten to 300 mm or less. If the tip barely moves, 400 mm will hold. This is not a laboratory method but it correlates well enough with flexural modulus to guide the decision on the day, which is when the decision has to be made. The supplier's datasheet might sit in a project folder somewhere, but the installer is standing under the joists with a screw gun and the next panel in hand.
VI. The 3 mm Thing That Keeps Ceilings Flat
PVC expands along its length when heated. The coefficient is roughly 0.05 to 0.08 mm per meter per degree Celsius, depending on formulation and filler content. In a room that cycles from 22°C at dawn to 38°C by mid-afternoon-common in tropical climates with uninsulated roof spaces-a three-meter panel grows by somewhere between 2.4 mm and 3.8 mm over the course of a day. It shrinks back at night. The cycle repeats daily for the life of the building.
If the panel ends are butted tight against the F-trim at installation, that daily expansion has nowhere to go. The panel buckles. The buckle starts in the middle, because that is where the compressive stress is highest, and it appears as a wave in the ceiling plane. The wave is about 5 mm high at first. It gets worse each cycle as the PVC yields slightly under the compression and the buckle becomes permanent.
The fix is a deliberate gap-3 mm at each end of every panel, measured with a spacer or a folded piece of cardboard or whatever flat object the installer has in the pocket. The panel is inserted fully into the F-trim at one end, pulled back 3 mm, and clipped. The opposite end receives the same treatment. The total expansion allowance is 6 mm per panel. In the data sheet from a responsible manufacturer, this number appears in bold text. On site, it appears if the contractor insists on it and disappears if nobody checks.
The gap is invisible once the ceiling is complete. The F-trim conceals it. The shadow line between the trim and the panel masks the fact that the panel is floating. But the gap is physically present, and it is the single reason a ceiling installed in February does not buckle in August. For flooring installations facing the same expansion physics, the spacing rules detailed in our expansion gap guide apply the same principle to a different plane, and the consequences of getting it wrong on the floor are louder but no less predictable.
VII. What to Inspect Before the First Clip Clicks
On a PVC ceiling site, the moment that determines the ceiling's lifespan is not when the last panel goes up. It is the window between when the grid is complete and when the first panel is clipped-typically a span of fifteen or twenty minutes when the installer checks the frame and either catches the problems that will show up later or accepts them as close enough. The ability to distinguish between the two is not always present on the tools.
The frame check that matters has five points. The first: is the F-trim horizontal all the way around, independent of the slab? If the answer requires looking at the slab to confirm, the answer is wrong. The second: are the runners level with each other across the span? A runner that is 2 mm higher than its neighbour creates a ridge in the ceiling that light catches at a low angle. The third: is the clip spacing consistent, and does it match the panel density that is actually going up rather than the density assumed in the quote? The fourth: have all cutout locations been identified and has the bridging been installed before the panels go up, not after the cutouts are made? Retrofitting a bridge behind an already-clipped panel is slow, frustrating, and usually skipped. The fifth: is there a 3 mm spacer on site, and is it being used at every panel end?
None of these checks requires specialised equipment. A spirit level. A tape measure. A consistent spacer. Eyes on the frame before the panels go up. The window is short and the pressure to start clipping is real, but the difference between a checked frame and an assumed one is about three years of flat ceiling versus eighteen months before the first callback. For readers involved in specifying materials across multiple ceiling and wall systems-where the same frame-level discipline determines whether a room looks finished or half-done-the room-by-room specification approach in our material specification guide connects ceiling choices to the floor and wall selections that share the same substrate.
Frequently Asked Questions About PVC Ceiling Panel Installation
Answers to the installation questions that arise after the panels arrive on site and the grid is waiting.
Q1: Can PVC ceiling panels be installed directly onto a timber frame without metal runners?
A: Yes, and it is common practice in residential projects across South and Southeast Asia. The clips are screwed directly into the timber battens. The condition that matters is spacing: timber battens should not exceed 400 mm centres for panels above 0.60 g/cm³ density, and 300 mm for softer panels. The battens themselves need to be straight and level. A warped batten transmits its curve to the ceiling, and no clip can correct a frame that is out of plane.
Q2: How do plastic clips and metal clips compare in cost and performance?
A: Plastic clips cost less per unit and install faster. Their long-term weakness is thermal creep: repeated expansion and contraction cycles gradually relax the jaw grip, which can open seams over several years. Metal clips maintain consistent grip force but require more insertion effort and cost more. For projects in high-temperature rooms or buildings with uninsulated roofs, metal clips or closely spaced plastic clips at 250 mm centres are the safer bet. The cheapest option is almost never the cheapest over five years if a seam opens in year two.
Q3: What is the correct clip spacing for PVC ceiling panels?
A: For standard 5 mm panels with density at or above 0.60 g/cm³, 400 mm between clip rows is generally sufficient in rooms without extreme temperature swings. For softer panels below 0.55 g/cm³, or for any panel in a room with direct roof heat, drop to 300 mm. The panel's technical data sheet should state the recommended spacing for the specific density and thickness of that product. If the data sheet does not include a clip spacing number, the manufacturer has not tested for sag under thermal load, which is worth knowing before the panels go up.
Q4: Do downlights require special framing?
A: Every cutout larger than a cable penetration needs a backing support. A cross-noggin between the two nearest runners, placed just behind the cutout location, prevents the panel from bowing at its weakest point. The time to install the bridging is before the panel is clipped. Adding it afterwards requires removing the panel or working through the cutout hole, which is slow and tends to get skipped on fast-moving sites.
Q5: How much expansion gap do PVC ceiling panels need?
A: Three millimetres at each end of every panel is the standard allowance for panels up to three meters in length. In rooms with extreme temperature variation-uninsulated roof spaces, sun-exposed corridors-some manufacturers recommend 4 mm or 5 mm at each end. The F-trim conceals the gap. The gap must not be filled with sealant, adhesive, or anything else that prevents the panel from sliding as it expands and contracts.
Q6: Can PVC ceiling panels be removed and reinstalled?
A: Yes, they can be unclipped and re-clipped provided the clips have not been damaged during removal. Metal clips survive removal better than plastic ones. The panel itself is usually unharmed if the removal is done carefully. This is one of the under-appreciated advantages of a clip-based ceiling system over a glued or screwed one: access to the ceiling void for electrical or plumbing work does not require destroying the ceiling.
Order PVC ceiling panels that come with the installation data your contractor actually needs
Our PVC ceiling boards ship with sheet-specific density values, clip spacing recommendations, expansion gap requirements, and cutout reinforcement instructions. The technical data is printed on the packaging and available as a single-page site reference. Contact us with your ceiling area, frame type, and lighting layout, and we'll confirm the specification before the panels leave the warehouse.
The Gap Between a Straight Line and a Straight Ceiling
A PVC ceiling panel that sags, buckles, or opens at the seams is not a material defect. It is a record. It records the expansion gap that was not left, the clip spacing that was stretched, the cutout that was not bridged, the starting line that was assumed rather than measured. The material itself is remarkably tolerant of site conditions-humidity, condensation, the occasional mop strike from below-but it is not tolerant of being installed against its own physics. No thermoplastic is.
What makes this knowledge actionable is not its complexity. It is simple. The F-trim needs a laser. The clips need a spacing that matches the panel density. The panel ends need 3 mm of air. The cutouts need a backing piece. The information fits on a single sheet of paper and has been available since the product category was invented. The reason it does not always reach the site is institutional, not technical: supply chains separate the people who manufacture the panels from the people who install them, and the paper that travels with the box is often the wrong kind of paper-a marketing brochure when the installer needed a one-page installation checklist in the local language.
A flat ceiling is the default outcome when the frame is right, the gaps are right, and the clips are right. A ceiling that is not flat is the result of one of those three things being wrong. It is not a mystery, and it is not bad luck. It is a line that was measured with a glance when it needed a square.
YUPSENI Team
Twenty-three years manufacturing PVC ceiling panels, foam boards, and co-extruded wall systems. Our ceiling range ships with density-specific installation data and is supplied to distributors and contractors in over 40 countries. Browse PVC ceiling products or about our manufacturing standards.
The information in this article is for general informational and educational purposes only. Installation methods, clip spacing, expansion gaps, and reinforcement details should be verified against the manufacturer's technical documentation for the specific product lot and project conditions. Local building codes and standards must take precedence over any general guidance provided here. Product images are for illustrative purposes. All trademarks belong to their respective owners. © 2026 YUPSENI. All rights reserved.