

PVC Fence Installation Guide: The Step-by-Step System That Prevents the 6 Most Expensive Callbacks
May 28, 2026
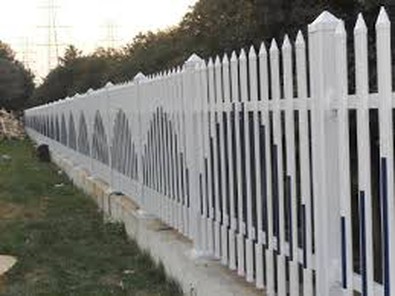
PVC fence post being set into a concrete footing during installation
On This Page
- The hole in the ground that decides everything
- Why a spirit level and a plumb bob are not the same thing
- The quiet millimeter that pushes the entire line out of square
- Gate installation is not fence installation (it just happens at the same time)
- Where water flows when the fence stands still
- Wind loads and the lever arms you didn't know you built
- The walk-along that catches what the eye skips
A PVC fence panel leaves the factory as a finished assembly. Its color, dimensions, and grain texture have already been set by the extrusion and fabrication process. The next stage-installation-is where most fence failures actually originate. A properly manufactured panel installed into an undersized post hole, or set against an out-of-plumb post, or constrained without room to expand under summer sun, will fail long before the material itself shows any sign of degradation. The fence you saw in the showroom will not be the fence standing in the yard twelve months later if the installation sequence cut corners that nobody could see after the dirt was backfilled.
Installation is not an afterthought to PVC fencing. It is the moment when a dimensionally stable product meets an unstable substrate-soil that shifts with moisture, posts that move with frost, and wind that works on every square meter of panel surface hour after hour, season after season. The decisions made during those hours of digging, pouring, and fastening determine whether the fence will require adjustment in two years or remain plumb, square, and silent for two decades.
This guide moves through the installation sequence in the order that mistakes appear, starting with the hole that receives the post and ending with the visual inspection that should happen before the tools are packed away.
I. The Hole in the Ground That Decides Everything
The foundation of a PVC fence is not the concrete that surrounds the post. It is the depth and diameter of the hole into which that concrete is poured. A post set into a hole that is too shallow becomes a lever with a short buried segment and a long exposed segment. Every gust of wind applies a force at the top of the post that is multiplied by the ratio of exposed height to buried depth. A 1.8-meter post set into a 0.3-meter hole has a burial ratio of 5:1, and the bending moment at the soil line is five times the applied force at the top. The same post set into a 0.6-meter hole has a ratio of 2:1, and the bending moment is one-third of the shallower installation. Post depth is not a guideline. It is the structural denominator of the entire fence.
For a standard 1.2 m to 1.8 m tall PVC fence, the post hole should extend 600 mm to 900 mm into undisturbed soil. The 600 mm minimum applies to regions without frost. In climates where the ground freezes, the hole must extend below the local frost line by at least 150 mm, because freeze-thaw cycles that grip the concrete footing will lift it incrementally-an effect called frost jacking-and after three or four winters the post will stand visibly higher than its neighbors, and the panel will no longer slide into the routed slots without binding.
The hole diameter matters for a different reason: concrete that is poured into a hole barely wider than the post itself forms a thin concrete collar that cracks under thermal stress. A minimum of 200 mm diameter around a standard 100 mm square post provides a concrete annulus of roughly 50 mm on each side, enough to distribute lateral loads into the surrounding soil without the concrete itself failing in tension. In loose or sandy soils, the diameter should increase to 250 mm or 300 mm, and the bottom of the hole should be compacted with 100 mm of gravel to provide a drainage path that prevents water from pooling against the concrete and accelerating freeze-thaw damage.
The gravel base is not optional:
A post set directly on soil-even compacted-can settle unevenly as water percolates through the soil beneath the concrete. A 100 mm layer of compacted angular gravel at the bottom of the hole provides a stable, free-draining base that prevents differential settlement. Skipping the gravel to save twenty minutes per hole is the most cost-effective way to guarantee that your fence line will develop a visible wave within three years.
II. Why a Spirit Level and a Plumb Bob Are Not the Same Thing
Setting a post to plumb seems like the simplest part of fence installation. Place the level on two adjacent faces, adjust until the bubbles center, brace, and pour. The procedure is straightforward, and yet out-of-plumb posts are the most common installation defect cited in warranty claims because the method that gets the post close to plumb is systematically different from the method that gets the post exactly plumb-and the difference is measured in millimetres at the base that become centimetres at the top.
A spirit level placed along the face of a 100 mm wide post provides a plumb reference over a short gauge length. If the level is 600 mm long and the post is 1.8 m tall, the level is checking the lower third of the post. The upper two-thirds could be out of plumb by several degrees, and the level would register nothing because it is not long enough to span the deviation. The bubble centre at the base creates a false confidence that propagates upward.
The correct method uses both a short level at the base and a plumb bob or a long straightedge that spans the full post height. Set the post roughly plumb with the short level, then hang a plumb bob from a temporary bracket at the top of the post and measure the offset at the base in two perpendicular planes. Adjust until the offset is zero to within 2 mm. Then brace the post in three directions-two perpendicular braces for the plumb planes and one diagonal for twist-and verify again before pouring concrete. The post that is within 2 mm of plumb over its full height will accept panels without forcing, and the routed slots in the post will align naturally with the panel tongues. The post that was set with only a short level will force the installer to persuade the panel into position with a mallet and a prayer, and the panel will remember the stress.
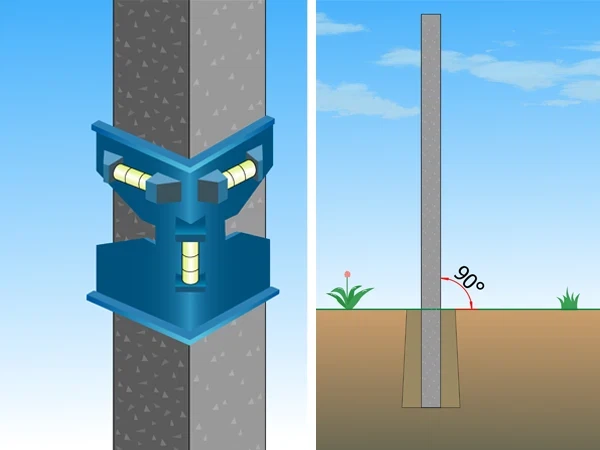
During installation, the vertical alignment of the PVC fence post is checked.
III. The Quiet Millimeter That Pushes the Entire Line Out of Square
PVC expands and contracts with temperature. The coefficient of linear thermal expansion for rigid PVC is approximately 50 to 60 × 10⁻⁶ m/m/°C, which means a 2.4 m panel subjected to a 40°C temperature swing-from a cold winter night at -5°C to a summer afternoon at 35°C-will change length by roughly 5 to 6 mm. This is not a large number in absolute terms, but it is an inexorable number. The panel will expand. The only question is whether the expansion is accommodated in the design or absorbed as stress in the material.
PVC fence systems accommodate expansion through the post-and-panel interface. The panel slides into a routed slot in the post, and the depth of that slot creates an expansion pocket. A properly installed panel should have a minimum of 5 mm of clearance at each end inside the post slot, providing 10 mm of total expansion capacity across the panel width. The panel should not be bottomed out against the post interior at either end during installation. If it is, a hot day will generate compressive stress that has no path to relief except to bow the panel outward or crack the post at the slot corners.
The practical check is straightforward: after sliding the panel into the post slots, insert a 5 mm spacer between the panel end and the post interior at one end, centre the panel, and verify that the spacer can be inserted at both ends without forcing. Remove the spacers before fastening, and the panel will have equal expansion room in both directions. For long fence runs with multiple panels, do not accumulate the expansion clearance at the terminal posts. Each panel requires its own expansion room at each post. A terminal post that receives the cumulative expansion of five panels-25 to 30 mm of movement-will not survive a single summer.
The material-selection decisions that determine whether a fence system can withstand environmental stress over decades are covered in our guide to choosing a PVC fence system. The installation techniques described here are the physical execution of the specification decisions made at the purchasing stage.
IV. Gate Installation Is Not Fence Installation (It Just Happens at the Same Time)
A fence panel sits passively between two posts. A gate swings from one post and latches to another, and every swing applies a dynamic load that a static panel never experiences. The gate post-the hinge post-must resist not only wind loads on its own face but the full lever-arm force of the gate's weight applied at the hinge mounting points. An inadequately set gate post will lean visibly within months, and the lean increases over time because the soil around the footing, once disturbed by movement, loses compaction and allows further displacement.
The gate post requires a larger footing than a standard line post. Where a standard post might use a 200 mm diameter hole, the gate post should be set in a hole of at least 300 mm diameter, extending to the full frost-line depth plus 150 mm, with concrete poured to ground level and crowned slightly to shed water away from the post base. The concrete should be allowed to cure for a minimum of 48 hours before the gate is hung-72 hours in cold weather. Hanging a gate on a post whose concrete has cured for only 24 hours is the single most common cause of gate-post lean, and it is entirely preventable by patience.
The hinges themselves must be through-bolted, not screwed. A lag screw driven into a PVC post wall has limited pull-out resistance because PVC does not hold threads the way wood does. A through-bolt with a washer and nut on the interior face of the post distributes the load across the full post cross-section and will not loosen incrementally with each gate cycle. For gates wider than 1.2 m, a steel or aluminum reinforcement insert inside the gate post is strongly recommended. The insert transfers hinge loads from the PVC surface to a metal structure that spans the full embedment depth, and the difference in long-term stability is the difference between a gate that needs adjustment after one season and a gate that swings true for the life of the fence.
V. Where Water Flows When the Fence Stands Still
PVC fence material is impervious to water. The posts, panels, and pickets do not absorb moisture, rot, or swell. But the installation creates interfaces where water can enter-the top of the post, the joint between post and panel, the base of the post where it meets the concrete footing-and what water does after it enters determines whether the fence remains dimensionally stable or develops problems that appear to be material defects.
Every post top must be capped. An uncapped post is an open vertical tube that collects rain and condensation and channels it down the interior of the post into the footing area, where freeze-thaw cycling eventually cracks the concrete from the inside. Post caps are included with every quality PVC fence system, and installing them is a thirty-second operation per post that prevents a failure mechanism that takes years to develop but is irreversible once it begins.
At the base of the post, the concrete footing should be crowned so that water drains away from the post rather than pooling against it. The crown does not need to be dramatic-a 10 mm rise over a 100 mm radius is sufficient to direct surface water outward. In regions with heavy rainfall or poor-draining soil, a bead of exterior-grade silicone sealant applied where the post enters the concrete provides an additional moisture barrier and prevents the capillary rise of water into the post interior.
For farms and rural properties where fences face additional environmental stress-livestock pressure, irrigation overspray, mud accumulation at the post base-the installation requirements are more demanding. Our guide to PVC farm fencing durability addresses the installation upgrades required for agricultural environments where the fence is a working structure, not a decorative boundary.
VI. Wind Loads and the Lever Arms You Didn't Know You Built
A solid-privacy PVC fence with no gaps between pickets presents a continuous surface to the wind. At a wind speed of 80 km/h-a strong but not extreme storm-the dynamic pressure on the fence face is approximately 0.4 kilopascals, or about 40 kg of force per square metre. A 1.8 m tall fence that runs for 20 metres presents 36 square metres of surface area, which translates to a total wind load of roughly 1,400 kg of force distributed across the fence line. That force is resisted by the posts in bending and transferred to the ground through the footings. And it is applied cyclically, gust after gust, for the duration of the storm.
The fence's ability to survive this repeated loading depends on post spacing, post embedment depth, and the soil's bearing capacity. A line post at 2.4 m spacing in a 1.8 m tall fence absorbs wind load from 4.3 square metres of panel-about 170 kg of force per post under the 80 km/h wind scenario. The bending moment at the soil line is that force multiplied by the mid-height of the panel, roughly 0.9 m above ground, producing approximately 1,500 Newton-metres per post. If the post is embedded 0.6 m into compacted soil and the footing diameter is adequate, the soil's passive resistance provides the counter-moment that keeps the post upright. If the embedment is only 0.45 m, the soil resistance is reduced by nearly half, and the post will lean.
For fence runs in exposed locations-hilltops, coastal areas, open plains-post spacing should be reduced to 1.8 m rather than the standard 2.4 m, and post embedment should be increased by 150 mm above the local minimum. The incremental material cost of additional posts is small relative to the cost of rebuilding a fence line that was toppled by a storm that the original installation never considered. If you are uncertain about wind exposure in the installation location, consult the regional wind-load map in your local building code and use the worst-case design values rather than the average values. The wind will not adjust its behaviour to match the optimistic assumption in your post-spacing decision.

Concrete footings being poured around PVC fence posts to secure them against wind loads and lateral forces.
VII. The Walk-Along That Catches What the Eye Skips
Before declaring a PVC fence installation complete, a systematic inspection of every post, panel, and gate will catch defects that are invisible from a distance but will announce themselves within the first year. The inspection sequence that follows is designed for a single person with a level, a tape measure, and a notepad. It takes twenty minutes for a fence run of fifty metres, and the defects it catches are the ones that a phone call six months later cannot undo without digging.
Start at one end and move post by post. Check plumb in two planes at each post with a level that spans at least 1.2 m. Any post that is out of plumb by more than 3 mm over the level length should be marked for adjustment. Check that every post cap is seated fully and that no cap is missing. Run a hand along the panel-to-post slots and feel for panels that are bottomed out against the post interior on either end-these are the panels that will buckle in summer heat. Verify that gate hinges are tight, that the gate swings freely without rubbing the latch post, and that the latch engages and releases smoothly without binding.
Look at the concrete footings. Freshly poured concrete should be cured hard with no visible cracking. If any footing has settled below grade and created a depression that collects water, mark it for regrading. If any footing is showing hairline cracks radiating from the post, the concrete was likely poured too wet or cured too quickly, and the footing should be monitored for further cracking during the first seasonal cycle. Finally, sight down the fence line from one end to the other at post-top height. Any post that is visibly higher or lower than its neighbours indicates differential settlement that will worsen without correction.
The broader comparison of PVC fencing against other materials-and the long-term cost analysis that justifies choosing a properly installed vinyl system-is detailed in our 20-year cost comparison of PVC, wood, aluminum, and iron fencing. For fence systems that include railing components-deck railings, porch balusters, stair handrails-the installation principles are related but not identical, and our PVC railing installation and selection guide covers the differences in post anchoring, baluster fastening, and code compliance for railing applications.
Frequently Asked Questions About PVC Fence Installation
Answers to common questions from homeowners and contractors installing PVC vinyl fencing systems in residential, commercial, and agricultural settings.
Q1: Can PVC fence posts be set directly in soil without concrete?
A: It is not recommended for any fence taller than 1.2 m. Soil alone does not provide sufficient lateral resistance to keep a post plumb under wind loads, and soil settles unevenly over time. For low decorative fences or temporary installations, a compacted gravel fill around the post may be acceptable, but the post will require more frequent realignment than a concrete-set post. For any permanent fence installation, concrete footings are the standard because they provide a stable, compacted mass that transfers lateral loads into the surrounding soil across a larger contact area.
Q2: How long should concrete cure before attaching fence panels?
A: Concrete reaches approximately 70% of its design strength after 7 days under normal curing conditions, but PVC fence panels can be installed 24 to 48 hours after the concrete is poured if the posts have been adequately braced and the concrete is firm to the touch. The key restriction is on gates: the gate post should cure for a minimum of 48 hours before the gate is hung, and 72 hours in cold weather. This longer cure time allows the concrete to develop sufficient compressive strength to resist the localized stresses that hinge mounting hardware applies.
Q3: What is the correct post spacing for a privacy fence?
A: Standard spacing is 2.4 m (8 ft) on centre, measured from the centre of one post to the centre of the next. This spacing works with standard panel widths and provides adequate wind-load resistance in most sheltered to moderately exposed locations. For exposed sites-hilltops, coastal areas, regions with high wind-reduce spacing to 1.8 m (6 ft) on centre and increase post embedment depth by 150 mm. Always verify spacing against the panel manufacturer's specification, as panel widths and post slot depths can vary slightly between manufacturers.
Q4: How do I prevent gate sag on a wide PVC gate?
A: Gate sag prevention requires three elements: a larger gate-post footing, through-bolted hinges, and a diagonal tension cable or anti-sag kit for gates wider than 1.2 m. The diagonal cable runs from the bottom hinge corner to the top latch corner, creating a tension triangle that prevents the gate frame from racking under its own weight. The cable should be adjustable so it can be retensioned as the gate settles over the first year. For gates wider than 1.8 m, a steel reinforcement insert inside the gate post is recommended in addition to the cable system.
Q5: Can PVC fence be installed in winter?
A: Yes, with modifications to the concrete work and material handling. Concrete poured in freezing conditions requires cold-weather admixtures or heated mixing water, and the freshly poured footings should be insulated with blankets to prevent freezing during the initial cure. PVC material becomes more brittle at low temperatures, so panels and posts should be handled carefully to avoid impact damage, and fasteners should be tightened gradually rather than driven to full torque immediately. Expansion gaps should be set at the maximum recommended width during winter installation, because the material is in its contracted state and will expand when temperatures rise.
Q6: What are the most common installation mistakes that void a warranty?
A: Three mistakes appear repeatedly in denied warranty claims. First, cutting panels or posts without sealing the cut edges-unsealed cut edges allow moisture into the internal cavities and can void coverage. Second, using screws that are too short or driven at an angle-the screw must fully penetrate the post wall and engage the panel tongue without stripping. Third, installing the fence without expansion gaps-panels that are bottomed out in the post slots will buckle, and the resulting damage is classified as installation error, not material defect. Always read the installation manual that ships with the fence system and follow it precisely; the warranty is contingent on installation per the manufacturer's documented procedure.
Start With a Fence System Designed to Be Installed Right the First Time
Our PVC fencing systems include routed post slots with engineered expansion clearance, post caps, and installation documentation that covers post depth, concrete specifications, gate reinforcement, and expansion-gap requirements for your climate zone. Every fence component is extruded, fabricated, and packaged to arrive on site dimensionally accurate and ready for installation-so the variables you control on installation day are the only variables between the fence you build and the fence that stands for twenty years.
The Fence You Cannot See Is the One That Lasts
A PVC fence is a visible object. Its white rails and evenly spaced pickets define the edge of a property as clearly as any architectural line. But the part of the fence that determines whether it will still be standing plumb and square ten summers from now is the part that disappears from view the moment the dirt is backfilled and the grass grows back: the depth of the hole, the gravel at its base, the concrete that surrounds the post, the 5 mm of air at each end of the panel that allows the material to breathe through a season without buckling.
The work that matters most in PVC fence installation is the work that the homeowner never inspects and the contractor photographs only for their own records. It is slow, precise, and repetitive. It does not look different from the work that produces a fence that fails in three years, except in the measurements that nobody takes after the fact. The installer who understands that the fence's longevity is determined underground, not above it, is the installer whose phone does not ring with a callback in spring when the frost comes out of the ground and the fence line reveals which posts were set to depth and which were set to convenience.
YUPSENI Team
With twenty years of extrusion and fabrication experience behind every PVC fence system we supply, our technical team has compiled the installation knowledge that turns a specification sheet into a standing structure. Our fence components ship with installation guides that cover your climate zone's frost depth, wind exposure, and expansion requirements-so the installer arrives on site with the information that prevents the callbacks. Explore our PVC fencing products or learn about our manufacturing standards.
The installation guidance provided in this article is based on general engineering principles and common industry practice for PVC vinyl fence systems. Local building codes, soil conditions, wind zones, and frost depths vary by location and may impose requirements that differ from the general recommendations presented here. Always consult local building authorities, follow the fence manufacturer's specific installation instructions, and engage a qualified contractor where required by regulation. © 2026 YUPSENI. All rights reserved.


